How to Configure a Custom Contract
Create a Custom Contract
Follow the instructions for adding a new contract to create a custom contract (select Custom on step 6).
Create Products
The next step is to create default product items which can be applied to the contract.:
- Expand the company and contract using the arrows to the left of them.
- Select and right-click the Products folder and select New | Product.
- Enter the product name and description.
-
Select the product type. On the following page is a description of the different types:
Product Product Type Non-specific claims GENERAL Job outcomes JOB Milestone payments MILESTONE Monthly on-programme payments OPP Outcome payments OUTCOME Review outcomes REVIEW Start payments START Technical certificate TECH TPS claims TPS Qualification outcomes VQ Week-based claims WEEKS Weekly on-programme payments WOPP - Select the Defaults tab. Only enter the default claim rate and volume amounts if the values are going to be the same across all strands of the contract (i.e. if all schemes or funding bands have the same claim value for this product).
- Select the Misc tab. The Active date and Obsolete date will default to the contract start and end dates, but can be modified as required.
- Click OK to save any changes.
Create Scheme Funding Bands
Depending on your management information reporting and contract it may be necessary to breakdown each scheme by funding band. This generally applies when learners on the same scheme attract different OPP or training week rates.
- Expand the company, contract and contract lines folder to display the available schemes.
- Select the scheme for which you wish to create funding bands, right-click it and select New | Contract line.
- On the Details tab, enter the description (funding band name) and select Funding band from the line type dropdown box.
- Click OK.
- Repeat as required for each scheme.
Create Contract Lines
Contract lines are claimable items on the contract broken down by scheme and, if applicable, funding band. To add a claimable contract line item to a scheme or funding band:
-
Expand the company, contract and contract lines folder to display the available schemes.
If your schemes are broken down by funding band, the schemes can also be expanded to display the funding bands.
-
Select the Products folder to display the default product items in the right-hand window.

- Drag and drop a product across from the right-hand window to the appropriate scheme. Click Yes on the message that appears to add the product to the scheme.
- Repeat the above steps to create additional contract lines for each scheme.
Edit Contract Line Values
- Expand the company, contract and contract lines folder to display the available schemes.
- Expand the schemes to display the contract lines within them.
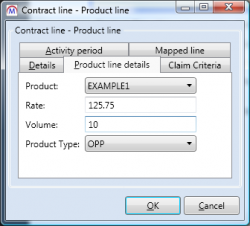
- Select the contract line to edit, right-click it and select Edit. This will display the Product Line window.
-
Select the Product line details tab.

- Select the product and product type from the dropdown boxes and enter the rate and volume. Please note that the rate should not be prefixed with a £ symbol. The volume is the ceiling-level contract volume and should only be entered if applicable.
- Click OK.
Edit Contract Line Claim Criteria
Applying claim criteria to contract lines is generally only applicable to auto-generated claim lines such as week payments, OPPs, etc.
- Expand down to the contract lines and select the contract line to edit.
-
Right-click the line and select Edit.
If the Edit option is not available, you will need to first set the line to draft mode by clicking the Draft menu option.
- Select the Claim Criteria tab.
- Click the
 button to add criteria.
 - Select the event type from the dropdown box and click OK.
-
Each type has predefined claim rules which are maintained by Tribal. For example, the OPP type will generate monthly OPPs, providing that the learner is in learning on the last Friday of the period.
In the claim criteria window, enter the description and the number of periods after which the criteria will be out of scope (this determines how many back periods of OPPs are generated for late-notified starters).
- The Filters tab can be used to attach additional field criteria. To add criteria:
- Click the
 button.
 - Select the field and function and enter the criteria.
- Tick the Exact match box if you wish the criteria to be case sensitive.
- Click OK.
- Click the
- The Auto set tab can be used to set the criteria REF to a specific value or a field value.
- Click OK to save the claim criteria when finished.
- Click OK to save the contract line changes.
Add Overrun Claim Periods
To add additional claim periods to a contract:
- Expand the relevant company and select the contract.
-
Click Add overrun claim period on the ribbon.

- The Add new claim period window will set the following defaults:
- Period start – This is set to the day after the final period end date.
- Period end – This defaults to the final period end date + 1 month.
- Description – This defaults to the final period description + 1.
- Edit the values as required and click OK.